• About
  • Work With Me
  • Shop
    • Shop My Home!
    • Iron Orchid Designs
    • DIY Paint
    • Essential Stencils
    • Sweet Pickens Milk Paint
    • A Maker’s Studio
    • Handmade Vintage Decor
    • Furniture for Sale
  • Blog
    • DIY Home Decor
    • DIY Projects
    • Furniture Makeovers
    • Holiday and Season
    • Travel & Events
    • Life & Updates
    • Weekly Roundups
  • Contact
  • Follow me on social!

Create With Cynthia

DIY Home Decor with a Vintage and Seasonal flair

You are here: Home / DIY Home Decor / Stencil Project for the Master Bedroom!

Stencil Project for the Master Bedroom!

May 3, 2020 by Cynthia Nessel 9 Comments

Sharing is caring!

  • Share
  • Tweet
  • Email

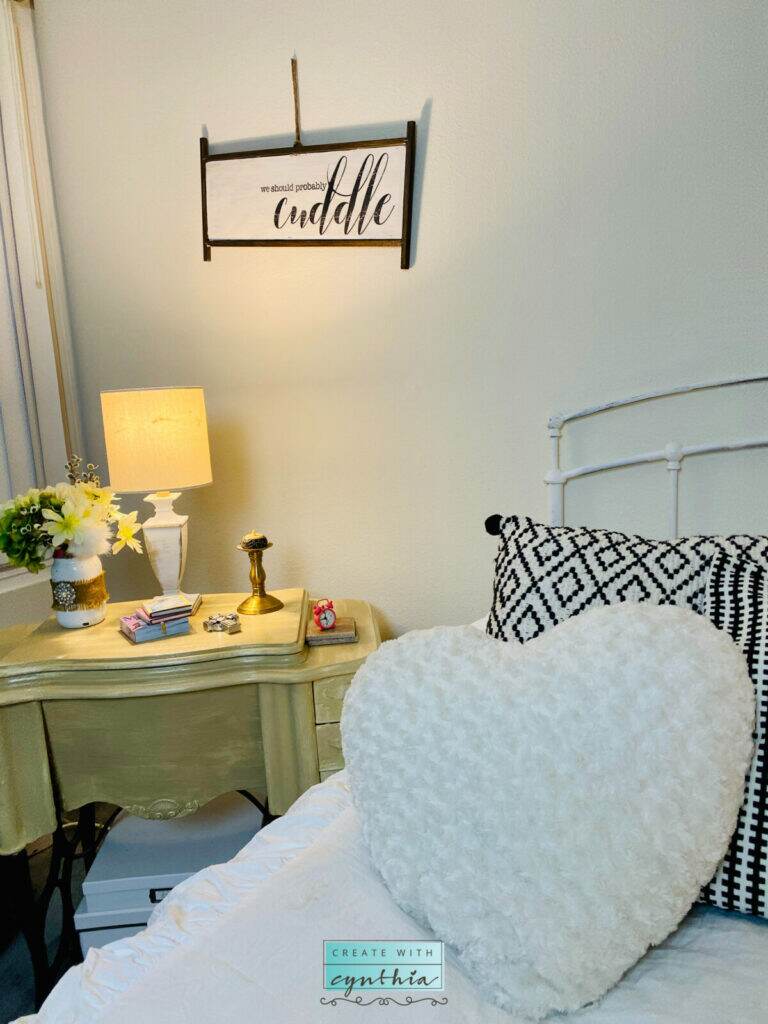
Are you looking to create an individual and one of a kind piece of art for your Master Bedroom? Here is an easy and fun stencil project for any room in your home. “We Should Probably Cuddle” is perfect for the Master Bedroom.

How to stencil on anything!

Today is all about stenciling Sweet Friends. Stenciling is on of my favorite craft projects. I’ve done this stencil project for my Laundry Room and this stencil project on a Furniture Makeover and this stencil project for my Front Porch and I could go on and on. Stencils add so much one of a kind character to home decor. Today, I’m talking about the Master Bedroom as it really was in need of a little bit of love.

This post is part of a DIY Blog Hop with Chas and Chas’ Crazy Creations and Tarah at Grandma’s House DIY. This month is all about DIY Projects for the Master Bedroom!

Stenciling Techniques for any Surface!

My Master Bedroom has been pretty neglected up until last week when I realized I was a desk short in my home. When the Pandemic of 2020 struck in early March and schools went to eLearning, desk space in our home became an issue. You can read about how I created a “Morning Routine during Quarantine” and more desk space out of shear desperation.

Essential Stencils Cuddle Sign n the Bedroom.

Back in February I wrote a post about “What Does February Remind You of and a Bit of Gratefulness.” I was feeling extra happy about the month of February and all the love, Valentine’s Day, Ski Week, etc.

I was also grateful to be gifted with some new stencils for a Master Bedroom project. Thank you Essential Stencils!!! I mentioned a video using the stencils and a new stenciling technique was also coming up on my You Tube channel.

You can save 10% on any purchases when shopping Essential Stencils by using the code CWC.

Master Bedroom with a Cuddle Sign.

Stencil Project for the Master Bedroom!

Have you subscribed to my You Tube Channel? I’ve got videos coming out each Monday and Wednesday, you can subscribe and get notified.

Essential Stencils are a heavy duty and reusable mylar material. The designs are so cute and there are so many to choose from. Stencils can be used on Wood and Metal and Fabric and even Glass.

There are a variety of different techniques when using Stencils and on this project I’m using the Swirling Technique. Check out the video here.

MATERIALS NEEDED TO MAKE A STENCILED SIGN:

Products used on project.
  1. Stencil by Essential Stencils
  2. Paint products by Debi’s Design Diary DIY. I used White Swan and Little Black Dress with Big Top Top Coat. The frame was sealed with Dark and Decrepit. 
  3. Stencil Brushes by Essential Stencils
  4. Any surface

DIRECTIONS FOR CREATING A STENCILED SIGN:

  1. Gather your materials.
  2. Paint your surface.
  3. Use Frog Tape to adhere stencil to surface.
  4. Use Stencil Brushes with paint.
  5. Swirl or Pounce paint onto surface. Either stenciling technique; Swirling or Pouncing, works well. I have a video on You Tube for each.
  6. Remove frog tape and stencil.
  7. Wash stencil in warm soapy water.
  8. Apply top coat to surface.

I created a video on You Tube of this project. You can check out my video on You Tube here. I’m also including step by step photos below.

Products needed for Master Bedroom sign.
Stencil placed on board.
Tape stencil on board.
Using a stencil brush to stencil a sign.
Use stencil brushes when stenciling.
Using black paint to stencil a board.
Using Black paint to stencil a sign.
Remove stencil and wash in soapy water.
Sand sign to create texture.
Clear coat sign with Big Top.
Painted clear coat on the sign.
create with cynthia, cynthia nessel, valentines day, spring project, spring home, february, diy home decor, essential stencils

Don’t forget to check out the other bloggers and their Bedroom DIY projects on this DIY Blog Hop. Just click on the links below.

Now go out there and Create Something.

Cynthia

Create with Cynthia logo.
Create with cynthia pin this logo
How to stencil on anything!Pin

You are invited to the Inlinkz link party!

Click here to enter

Disclosure: Many of the links on this blog are affiliate links. CreateWithCynthia.com receives a small commission when certain items are purchased, but the price is the same for you. Thank you for your help in supporting my little space on the internet.

Look for other surface to use stencils on. Shop the links below.

Sharing is caring!

  • Share
  • Tweet
  • Email

Filed Under: DIY Home Decor Tagged With: Create With Cynthia, diy paint, essential stencils

the PAST
the FUTURE

FOLLOW ME!

Comments

  1. blankChas says

    May 3, 2020 at 7:55 am

    I LOVE this sign friend! I think I need one in my home. Thank you so much for joining the party!

    Reply
    • blankCynthia Nessel says

      May 3, 2020 at 11:26 am

      I’m so glad you like it!

      Reply
  2. blanktarahlynn says

    May 4, 2020 at 8:02 am

    This turned out so great, I totally love it!

    Reply
    • blankCynthia Nessel says

      May 4, 2020 at 8:31 pm

      Awe thanks!

      Reply
  3. blankrawsonjl says

    May 7, 2020 at 3:51 pm

    That is a really cute sign. Thanks for sharing with us at Encouraging Hearts and Home. Pinned.

    Reply
    • blankCynthia Nessel says

      May 8, 2020 at 9:15 am

      Thanks Joanne. I hope you are staying safe and healthy.

      Reply
  4. blankCynthia says

    May 11, 2020 at 5:54 am

    Your sign turned out lovely. You’re right, it’s perfect for a master bedroom and it looks great in your space.

    Reply
    • blankCynthia Nessel says

      May 13, 2020 at 7:52 pm

      Thanks Sweet Friend!

      Reply

Leave a Reply Cancel reply

Your email address will not be published. Required fields are marked *

Subscribe Here For:

Hello & Welcome!

Cynthia Nessel, Create with Cynthia

Hi, I’m Cynthia Nessel, the founder and editor of Create with Cynthia, a DIY craft and hobby blog, where I share tips and step-by-step tutorials for vintage enthusiasts. This space is an expression of who I am and what I love to do. ❤ Read More »

Shop

blank blank blank blank

Recent Posts

Little end Table Makeover on Create With Cynthia

End Table Furniture Makeover!

Happy Halloween Sign on Create With Cynthia

Happy Halloween Sign DIY!

Home on Northwood at Create With Cynthia

Summer Adventures and Buying a New Home!

Categories

FURNITURE MAKEOVERS

HOME DECOR

DIY PROJECTS

HOLIDAY & SEASON

LIFE & UPDATES

TRAVEL & EVENTS

LINK PARTIES

Follow

Tips on using Iron Orchid Design Transfers on a Furniture Makeover!

Thanksgiving Tablescape Ideas!

Selling in an Antique Mall!!!

DIY Monogrammed Handkerchief's!

Craft Projects with A Maker's Studio products.

More Links

  • About
  • Work With Me
  • Contact me

Create with Cynthia

Vintage Design & Decor

Vintage

Design

FOLLOW ME

Follow @CreateWithCynthia on Instagram

Copyright © 2021 · Create With Cynthia· Website Design by Chantilly Patiño