• ABOUT
  • Work With Me
  • Shop
    • IRON ORCHID DESIGNS at THE RED DOOR!
    • Shop My Home!
    • Furniture for Sale
  • Blog
    • DIY Home Decor
    • DIY Projects
    • Furniture Makeovers
    • Holiday and Season
    • Travel & Events
    • Life & Updates
    • Weekly Roundups
  • Contact
  • Follow me on social!

Create With Cynthia

DIY Home Decor with a Vintage and Seasonal flair

You are here: Home / DIY Projects / 5 Steps to Restoring Thrift Store Items (Video Series – Part 4)

5 Steps to Restoring Thrift Store Items (Video Series – Part 4)

December 4, 2018 by Cynthia Nessel Leave a Comment

Sharing is caring!

  • Share
  • Tweet
  • Email

Today is Part 4 of my “5 Steps to Restoring Thrift Store Items” series. This is a five-part video series to share tips for restoring thrift store items at home.  I will be sharing all about A Maker’s Studio products.

Restoring Thrift Store Items with A Maker’s Studio Products

Restoring Thrift Store Items Video Series

I love to restore thrift store items, as it allows me to craft a beautiful life.  Being a Difference Maker and enjoying the bragging rights is what I love to do.

A Maker’s Studio Launch

As you know, I am a Maker Boss for A Maker’s Studio and carry all of their products on my website.  You can go here to shop.

Last month, I went to the Launch of A Maker’s Studio in Memphis, Tennessee.  You can go here to read about my trip.

I will be sharing all about A Maker’s Studio products. Refurbishing second hand items. As you know, I am a Maker Boss for A Maker’s Studio and carry all of their products online on my website.  You can go here to shop.

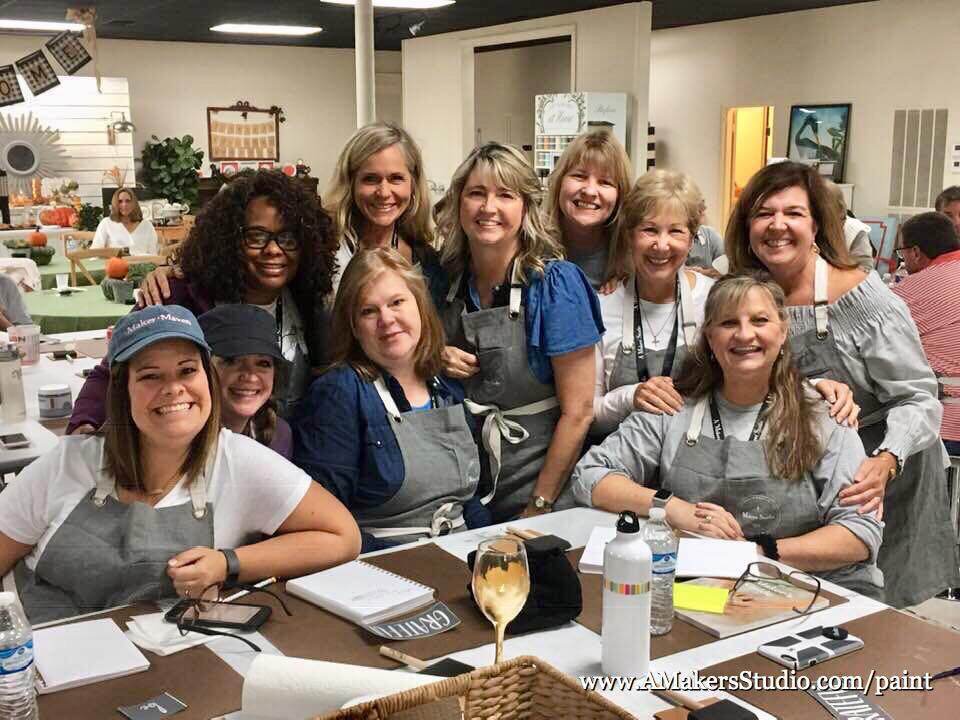
The Launch of A Maker’s Sudio Products was a huge celebration. I met so many amazing women and heard some very inspirational speakers. 

Create with cynthia, A Maker's Studio, Gilding, Craft a Beautiful Life, Enjoy the Bragging Rights, Rescue and Restore Paint, diy furniture, painted furniture

I felt so blessed to be invited to Amy and Gene Howard’s home.  The picture above was Amy and I at the beginning of the launch.  Below are me and other Maker’s enjoy a fabulous time getting to know each other.

Create with cynthia, A Maker's Studio, Gilding, Craft a Beautiful Life, Enjoy the Bragging Rights, Rescue and Restore Paint, diy furniture, painted furniture

Restoring Thrift Store Items (next steps)

Once you clean your piece with furniture polish, you can paint with the Rescue and Restore Paint, no other prep is needed. In fact, A Maker’s Studio has a variety of Sealer’s, Waxes and Stains that can be used over the paint but none are required. The Rescue and Restore Paint has a built-in Sealer.

Create with cynthia, cynthia nesse, A Maker's Studio, Gilding, Craft a Beautiful Life, Enjoy the Bragging Rights, Rescue and Restore Paint, diy furniture, painted furniture, a maker's studio product reviews

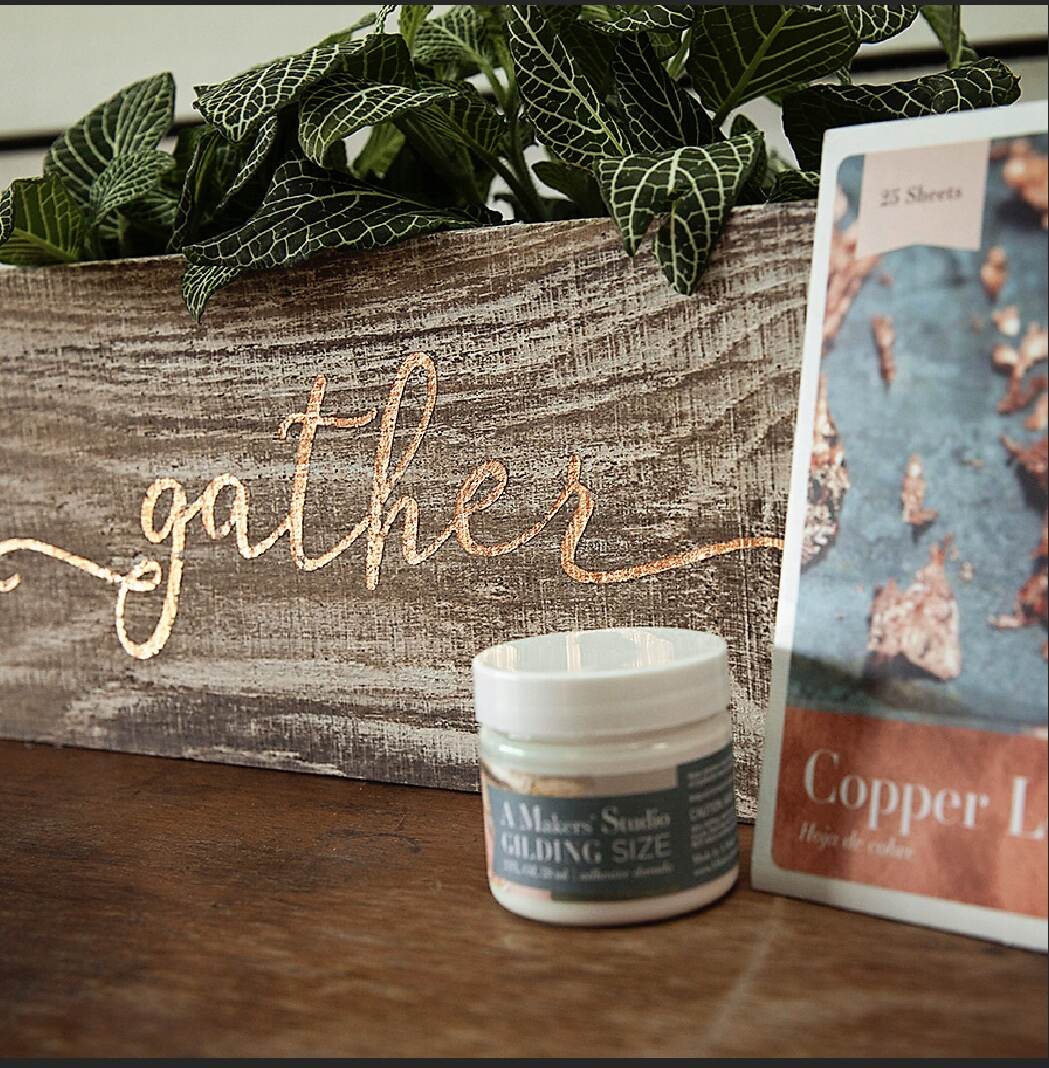
Once your piece has been painted the real fun begins. I love stenciling or gilding and today is all about gilding!

Create with cynthia, A Maker's Studio, Gilding, Craft a Beautiful Life, Enjoy the Bragging Rights, Rescue and Restore Paint, diy furniture, painted furniture

There are only three steps to Gilding:

  1. Find your piece and apply the Gilding Size and let it sit for about ten minutes so the Gilding can come to Tack.
  2. Apply the Leaf. A Maker’s Studio carries Gold, Silver, Copper and Variegated Copper. When applying the Leaf you should rub it into the piece which is a process called burnishing. The dictionary says, burnish means to polish something by rubbing.
  3. Final step is the take a Chip Brush and Brush the piece to remove the remaining Leaf that has not adhered with the Tack.
Create with cynthia, A Maker's Studio, Gilding, Craft a Beautiful Life, Enjoy the Bragging Rights, Rescue and Restore Paint, cynthia nessel, san francisco bloggers, bay area bloggers

Not only can anything be gilded; wood, fabric, metal, glass, hardware, etc. but gilding can be used with our Adhesive Stencils as well.

Stay tuned for Part 5 (the final installment) of my “5 Steps to Restoring Thrift Store Items.”

Watch the video tutorial

If you’d like to watch my video, you can visit my YouTube channel; Cynthia Nessel – Create with Cynthia.  Click here to watch this video on YouTube.

Thanks for following along!  I look forward to seeing what projects you’re working on.  If you have a project to share, you can post it on Instagram or Facebook and use the hashtag #CreatewithCynthia to share them with me.

create with cynthia, cynthia nessel, furniture restoration, diy vintage decor, redwood city, san francisco bloggers, bay area bloggers

Sharing is caring!

  • Share
  • Tweet
  • Email

Filed Under: DIY Home Decor, DIY Projects Tagged With: A Maker's Studio, Craft a Beautiful Life, Create With Cynthia, DIY furniture, Enjoy the Bragging Rights, Gilding, Rescue and Restore Paint

the PAST
the FUTURE

FOLLOW ME!

Leave a Reply Cancel reply

Your email address will not be published. Required fields are marked *

Subscribe Here For:

Hello & Welcome!

Cynthia Nessel, Create with Cynthia

Hi, I’m Cynthia Nessel, the founder and editor of Create with Cynthia, a DIY craft and hobby blog, where I share tips and step-by-step tutorials for vintage enthusiasts. This space is an expression of who I am and what I love to do. ❤ Read More »

Shop

blank

Recent Posts

Little end Table Makeover on Create With Cynthia

End Table Furniture Makeover!

Happy Halloween Sign on Create With Cynthia

Happy Halloween Sign DIY!

Home on Northwood at Create With Cynthia

Summer Adventures and Buying a New Home!

Categories

FURNITURE MAKEOVERS

HOME DECOR

DIY PROJECTS

HOLIDAY & SEASON

LIFE & UPDATES

TRAVEL & EVENTS

LINK PARTIES

Follow

Dollar Store Planter Ideas!

Tips on using Iron Orchid Design Transfers on a Furniture Makeover!

Selling in an Antique Mall!!!

DIY Monogrammed Handkerchief's!

Craft Projects with A Maker's Studio products.

More Links

  • ABOUT
  • Work With Me
  • Contact me

Create with Cynthia

Vintage Design & Decor

Vintage

Design

FOLLOW ME

Follow @CreateWithCynthia on Instagram

Copyright © 2021 · Create With Cynthia· Website Design by Chantilly Patiño