• ABOUT
  • Work With Me
  • Blog
    • DIY Home Decor
    • DIY Projects
    • Furniture Makeovers
    • Holiday and Season
    • Travel & Events
    • Life & Updates
    • Weekly Roundups
  • Contact
  • Follow me on social!

Create With Cynthia

DIY Home Decor with a Vintage and Seasonal flair

You are here: Home / DIY Projects / Walnut Wreath DIY!

Walnut Wreath DIY!

January 2, 2020 by Cynthia Nessel

Sharing is caring!

  • Share
  • Tweet
  • Email

Nutcrackers seem to be a timeless and traditional decor piece used all year long. Do you decorate with Nutcrackers, Sweet Friends? I decorated with a few Nutcrackers this holiday year and find them to be so unique and individual.

create with cynthia, cynthia nessel, diy home decor, walnut wreath diy, wreath tutorial, walnut wreath tutorial, myrustoleum, rustoleumchalkpaint, create with cynthia, cynthia nessel, diy home decor, walnut wreath diy, wreath tutorial, walnut wreath tutorial

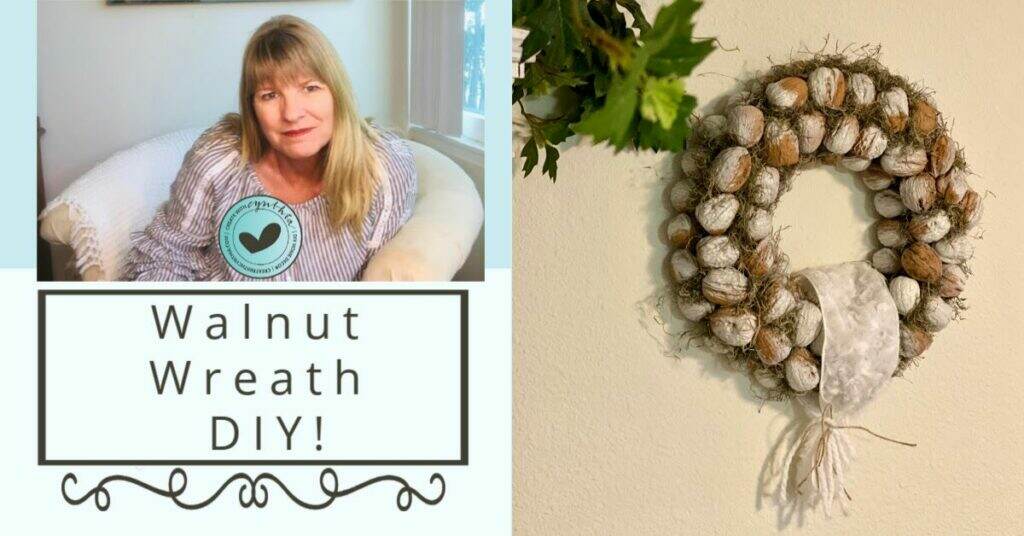
Harvest Wreath using Walnuts!

I guess I got a little hooked on Nutcrackers this year, as much as I was trying not too. After Christmas and my Nutcracker Tablescape Blog Hop, I started thinking it might be fun to create some additional decor to go hand in hand with the Nutcrackers. Since Nutcrackers are seasonal, not just during Christmas, I plan to keep my Nutcracker decor alive through January.

create with cynthia, cynthia nessel, diy home decor, walnut wreath diy, wreath tutorial, walnut wreath tutorial

Nutcrackers and Walnut Decor!

Walnuts and Nutcrackers go hand in hand. The Walnut Wreath DIY is simple and took less than 30 minutes to make. The tutorial is below or you can watch it on You Tube here.

create with cynthia, cynthia nessel, diy home decor, walnut wreath diy, wreath tutorial, walnut wreath tutorial
Watch the Walnut Wreath DIY video here.

I was inspired to make the Walnut Wreath after the December Tablescape Blog Hop where I decorated my table with the theme of Nutcrackers. If you missed the Blog Hop you can read it here.

create with cynthia, cynthia nessel, diy home decor, walnut wreath diy, wreath tutorial, walnut wreath tutorial

Materials needed for the Walnut Wreath DIY:

create with cynthia, cynthia nessel, diy home decor, walnut wreath diy, wreath tutorial, walnut wreath tutorial
  • 10 inch foam wreath – I used a green wreath from the Dollar Store
  • 2 lbs of Jumbo Walnuts – I used Diamond of California Jumbo Walnuts (2 bags for one 10 inch wreath)
  • Glue Gun and Glue Sticks – I used Art Minds Glue Gun and Sticks
  • Moss – I used brown moss from the Dollar Store
  • Spray Paint – I used Rustoleum 2X Ultra Cover in the color Ivory Bisque
  • Ribbon – I used Faux Fur Ribbon, White Yarn and Twine
create with cynthia, cynthia nessel, diy home decor, walnut wreath diy, wreath tutorial, walnut wreath tutorial

Directions on how to create a Walnut Wreath:

Step one: Gather your walnuts to be painted. Spray paint walnuts if desired. This step is optional. I used 2 pounds of walnuts for a 10 inch wreath.

create with cynthia, cynthia nessel, diy home decor, walnut wreath diy, wreath tutorial, walnut wreath tutorial

Step two: Spray paint your foam wreath. This step is optional, but is necessary if you don’t use moss..

create with cynthia, cynthia nessel, diy home decor, walnut wreath diy, wreath tutorial, walnut wreath tutorial

Step three: Keep wreath on a flat surface and glue walnuts to wreath. Add a dollop of glue to walnut and hold onto wreath for a few seconds.

create with cynthia, cynthia nessel, diy home decor, walnut wreath diy, wreath tutorial, walnut wreath tutorial

Step four: Start by gluing the exterior first, then the interior.

create with cynthia, cynthia nessel, diy home decor, walnut wreath diy, wreath tutorial, walnut wreath tutorial

Step five: Once the exterior and interior is complete, add walnuts to the top center.

create with cynthia, cynthia nessel, diy home decor, walnut wreath diy, wreath tutorial, walnut wreath tutorial

Step six: Once the wreath is full of walnuts, add moss. Trim moss into small pieces. Use glue and add moss in between each walnut. Be careful not to burn yourself when adding the moss.

create with cynthia, cynthia nessel, diy home decor, walnut wreath diy, wreath tutorial, walnut wreath tutorial

Step seven: Trim moss so that it does not over load wreath. Think of it like you are giving the wreath a haircut.

create with cynthia, cynthia nessel, diy home decor, walnut wreath diy, wreath tutorial, walnut wreath tutorial

Step eight: Add ribbon to your wreath. Any ribbon combination will look great. I used a Faux Fur Ribbon with white yarn and twine.

create with cynthia, cynthia nessel, diy home decor, walnut wreath diy, wreath tutorial, walnut wreath tutorial

Tips when creating a Walnut Wreath:

  • Keep foam wreath on flat surface when creating wreath.
  • Painting the foam wreath is optional. You can just use moss to fill in holes.
  • Do not glue moss onto wreath and then walnuts onto wreath. The walnuts are too heavy and will not adhere properly.
  • If you plan to hang your wreath directly on the wall, then there is no need to add a hanger to the back of the wreath, as there are holes between the walnuts which can be used for hanging.
  • If you decide to use a wreath stand for hanging your wreath, then glue a ribbon hanger on the back of the wreath.
  • Shop at the Dollar Store, I found the wreath and moss there and it cut costs.

If you’d prefer to purchase all of the products online, here are the links:

I hope your inspired to go our there and create beautiful home decor for your home.

Cynthia

Create with Cynthia, Cynthia Nessel, A Maker's Studio, Craft a Beautiful life, Enjoy the bragging rights, Thanksgiving
Create with cynthia, cynthia nessel, A Maker's studio, Maker Boss, Vintage Telephone Bench, Refurbished Furniture, DIY Painted furniture, debi's design diary diy paint
blank

DISCLOSURE

Many of the links on this blog are affiliate links. CreateWithCynthia.com receives a small commission when certain items are purchased, but the price is the same for you. CreateWithCynthia.com is a participant in the Amazon Services LLC Associates Program, an affiliate advertising program designed to provide a means for sites to earn advertising fees by advertising and linking to amazon.com.

Sharing is caring!

  • Share
  • Tweet
  • Email

Filed Under: DIY Projects

the PAST
the FUTURE

FOLLOW ME!

Subscribe Here For:

Hello & Welcome!

Cynthia Nessel, Create with Cynthia

Hi, I’m Cynthia Nessel, the founder and editor of Create with Cynthia, a DIY craft and hobby blog, where I share tips and step-by-step tutorials for vintage enthusiasts. This space is an expression of who I am and what I love to do. ❤ Read More »

Recent Posts

Barstools using Iron Orchid Designs Decor Transfer

Vintage Barstools in a New Space!

My Favorite Dress Up Clothes on Create With Cynthia

My Favorite Dress Up Clothes!

Mother's Day Gift Guide 2021!-8

Mother’s Day Gift Guide 2021 and a Story About My Mom!

Categories

FURNITURE MAKEOVERS

HOME DECOR

DIY PROJECTS

HOLIDAY & SEASON

LIFE & UPDATES

TRAVEL & EVENTS

LINK PARTIES

Follow

Dollar Store Planter Ideas!

Tips on using Iron Orchid Design Transfers on a Furniture Makeover!

Nutcracker Christmas Table Decor!

Selling in an Antique Mall!!!

DIY Monogrammed Handkerchief's!

More Links

  • ABOUT OLD
  • Work With Me
  • Contact me

Create with Cynthia

Vintage Design & Decor

Vintage

Design

FOLLOW ME

Follow @CreateWithCynthia on Instagram

Copyright © 2025 · Create With Cynthia· Website Design by Chantilly Patiño